IMPORT USERS
Need to add new users or update the users data?
Upload a excel or csv file from you HR system, and let's upload.
HOW TO UPDATE/ADD USERS BY UPLOAD
In this video, you can see the full video on how you do a user upload. view below steps for a close description of each step

Step 1. Uploading your Import File
Navigate to the “Users Management” section and select “Import Users”.

Before uploading, ensure your file is compatible:
-
Format: Excel (.xlsx) or CSV (.csv)
-
First row: Must contain column headers (e.g., "First Name", "Last Name", "Email").
-
Limit: Maximum of 5,000 rows.
Feel free to download our import file template as a guide!
You can also download the current user list from Sociuu by going to All Users and clicking on Export and update with new users, departments, and groups.

For adding usergroups into the import file, simply add a column with the header Usergroups and add the usergroups for each user, separated by a character like a comma. You can follow the example here to the right.
Ensure that the separator you use for usergroups does not appear within the group names themselves. For instance, if you have a usergroup named marketing,blog, opt for a distinct separator character (such as "." or ";") to ensure proper interpretation from our system.


Converting your old user import file
If you have previously imported users, updating it to the new format is straightforward. Simply replace the characters in the usergroup columns with the full name of the respective usergroup they belong to as in the image on the left.
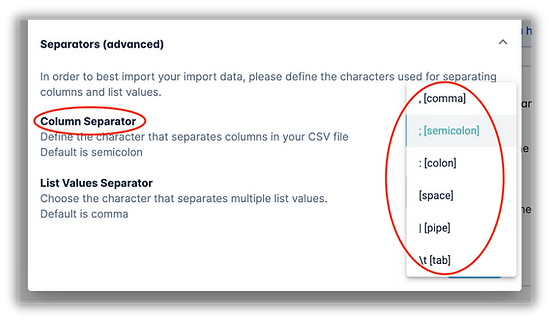
Click Start Import and drag or upload your file. Specify if your file has headers or not and remember to indicate the separator character used to separate the usergroups information, such as the commas in the example file that separate the user groups.


If you have uploaded a CSV file, you will also need to select the column separator character.
Please note, that your file can also look differently by e.g. having multiple collums indicating values, that should be added as user groups. Then you simply select all these collumns in the next steps.
Step 2. Select your Header Row
After uploading your file, you’ll need to select the row that contains the header data. If your file includes headers, simply choose the appropriate row. However, if your file doesn’t have headers, you can skip this step.

Step 3. Map Header Columns
Next, you'll need to match and confirm each header from your imported file with the corresponding property in Sociuu. For example, if your file contains a column for first names, you'll match it with the "First name" property in Sociuu.

For columns containing department information, confirm the Department property. Additionally, you can choose to include the departments as user groups by checking the box to the right side.

Step 4. Import Settings
Choose how to manage existing users and new usergroups.
Duplicate User Action
Decide what will happen to existing users in your platform. You can either skip them, so they won't be updated with information from this file and keep the current data or update their information with the data from the new import file.


Usergroup Management Options
How should the user groups from the file be imported? Specify whether these user groups should be added as an addition to the current Sociuu list of user groups or replace all user groups, effectively removing the current ones and replacing them with those from the import file.
Additionally, you have the option to delete existing users who are not included in your import file. In this make sure the the whole Sociuu set up is 100% mirroring your import file. This action should however be approached with caution as it is irreversible.

Step 5. Review & Correct
After configuring the import settings, you'll have the opportunity to review and correct any errors in the import file. The system will notify you of any errors, such as empty fields or missing data.

For example, if a user's first name is missing as above, the system will flag it as an error. To correct such errors or add missing information, simply click on the respective user and update the details accordingly.

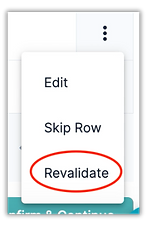
By clicking on the three dots located on the right side of the user, you can access the following actions:

Skip user
This action hides the user and excludes them from the import process.

Revalidate
After correcting errors, you can revalidate the user, enabling the system to recognize that the error has been fixed, and the user is now considered valid.
Additionally, you can search for specific users using the search bar.

You can also toggle the switch on the top right corner to check for any remaining errors in the file.

Once you've reviewed and corrected any errors, and you're satisfied with the import settings, you can proceed to confirm the import. You'll then receive an overview of the import options chosen and the status of the users being imported.

Finally, Click Continue and Start Import to complete the import process.
Step 6. Your Import File is Uploaded!
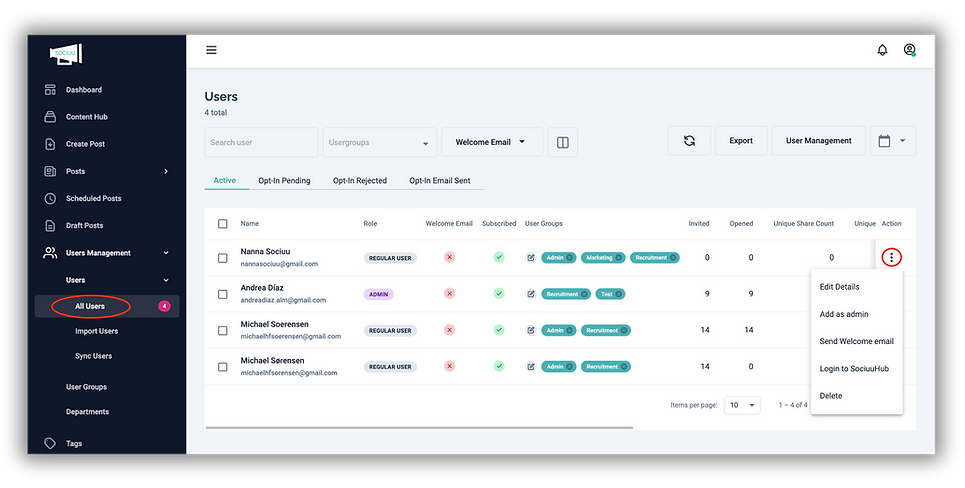
You can now navigate to the Users section to access and see and manage the newly imported users.
From the three action dots in the right side of each user, you can perform various actions such as editing user details, assigning admin roles, sending welcome emails, accessing their SociuuHub user view, or deleting users as needed.